Pages

Tuesday, January 29, 2013

Avoid Bad Food Photos


So, which burger would you eat? The first? The second? I'm assuming you chose the second.

Why did you choose the second? Did you choose it because it looks more appetizing? Fresher? More vibrant? Yes, all of the above.

You may have heard of some of the tricks photographers use to make food look more appetizing in photography. Back in the old days of film, photographers did rely more on pre-production to get great results. While those principles still hold true, much can be done to spice up a food photo.

Food is an interesting subject. What looks good, and even appetizing to the naked eye may not look so hot when viewed as a photo. Food photos need to convey things that we often miss when we're hungry and our meal is sitting on a plate before us. Food photos need to be the best representative of a dish.

Take the examples above. They began as the same photo. The burger on the left is the image that a restaurant may use because it is a clear, quality image of their burger. While this is a technically adequate photo, you've got to admit that the burger looks lifeless and not very appealing. Remember, while I'm a photographer, I'm also a marketing guy and a foodie. Mix these three things together and I'm the guy you want photographing your food.

I knew that I could make that burger look good so I dug into my Photoshop bag of tricks. Here's what I did:

The bun: It was dull, pale and looked washed out. Yuck. Who wants bread that appears doughy and under-baked? Not me. I used a variety of brushes and brown and golden shades to simulate a toasty, baked look.

The veggies: The veggies look as though they sat in the fridge for a year too long. Yuck, dull colorless veggies aren't so tasty to the eye, so we can assume they're not that tasty to the mouth. I used the natural colors of the veggies and improve their vibrance and saturation. I hand shaded key areas and added shine.

The cheese: The cheese looked plasticky and congealed. I made it look fresh, thick and gooey. Way better looking, don't you think?

The meat: The essence of any burger is the meat. Good restaurants use approximately an 80/20 mix to give a juicy result. However, the juicy appearance quickly goes away as the meat cools. In the original photo, the burger may have sat around a bit too long, giving it a cold, dry look. I added some red, brown and black to the burger and highlighted small spots to give the look of overexposed catch light, simulating shine.

These simple tricks made an adequate, technical photo into a stunning, print ready image.

Wednesday, January 9, 2013

Value Photography Gear

I always support small and local businesses whenever I can. However, with some camera gear this is an enormous disparity between Amazon pricing and the prices found at local camera shops. Most primary camera gear is sold at MSRP, regardless of the source. However, accessory prices can vary widely.

For the past year or so I've used Amazon as a great resource for photography gear to support my growing work. Simple things like Lens Pens, Bags, Light Stands and even diffusers can be bought on the cheap on Amazon.

I always scrutinize lower cost products. Many times lower cost products are lower quality products, however that's not a universal rule. If you're a careful and smart shopper you can save money on supplies so that you can spend more freely on bodies and lenses.


Sunday, January 6, 2013

Product Photography

Your customers are visual people. It doesn't matter if you make the best products in the world. If it looks like their photos were taken on a cell phone camera from 2002, you have to upgrade. While it helps if you're a professional photographer, there are some things that anyone can do to get better photos. You need some equipment, and some practice but you can get the job done.

1) DSLR. There are a number of great "pro-sumer" quality Digital SLR cameras on the market. Find one that fits your budget. Get a good lens with a large maximum aperture. Learn how to use the camera and practice shooting everything. Experiment with aperture sizes, focusing, perspective, etc. Buy a used one and save some money. These things are built pretty well, and you'll only be using it on a tripod. Expect to spend $500 to $3500 on camera and lens.


2) Tripod. Get a good quality tripod. Expect to spend $75 to $150.

3) Product light tent and high wattage constant lights. $100 to $500.

For less than $1k, you can have a more than adequate rig for capturing quality images for use on your website.

Keep in mind, photography is both an art and a skill. If you commit to learning both, you will do just fine. If you simply don't have the time to commit learning something new, hire a photographer. Good photos are important. It makes a bigger difference than you may think. 


Saturday, January 5, 2013

Dave Hill Photography

My inspiration comes from a variety of photographers that range from Ansel Adams to Salvador Dali. For the past year or so I've had a hard time keeping myself from checking out Dave Hill's work. Dave's a commercial photog out in Cali. His work has a decidedly surreal appearance. While his work looks HDRish, he's said that his work isn't HDR, but achieved through a proprietary lighting plan.

Check him out:

http://www.davehillphoto.com/

Friday, January 4, 2013

Is it really about the equipment?

When I began photography I was a young teenager with a home darkroom with baths, a timer, some gels, a red light and an enlarger. I had a 35mm SLR and I primarily shot hand wound, bulk Tri-X film and I had a fast prime lens. That was it. There wasn't anything fancy about my gear or my darkroom. I had the essential tools required to achieve high quality prints  without the aid of a computer, software or a print shop. From start to finish, I created images entirely on my own.

Capturing great images was simply about getting outside and releasing the shutter. Because the only storage medium was the film itself, each shot was more careful, more deliberate. My camera and lens were of the manual focus type, so it took time to make sure the subject was clear. Getting the right exposure required reading the light. Back then I bracketed to ensure proper exposure and not because I intended to render HDR images. The whole act of taking a picture involved more brain power, more thinking, more looking, more adjusting. I never felt the process to be cumbersome or antiquated. These very basic cameras by today's standards fueled my passion for photography and the images I took then, hold up very well today as examples of fine photography.

All of this came to mind when I was researching the Nikon D800. Its a fine camera by anyone's standards and creates medium-format quality images. When compared to the technology of even two years ago, it was impossible for anyone to have fathomed a camera of this quality being available to the serious amateur or semi-pro for less than $3000.

While camera technology has continued to evolve since day one, digital photography took a step backward before it was able to move forward. Early DSLRs were neat, but the images were a compromise. Now, I couldn't imagine going back to film for regular work. The advantages of digital are endless, however photography now for many is an exercise in spending money, rather than taking great photos.

Anyone just entering the world of photography without prior home darkroom and film experience is missing out on a lot of the art of the medium. I'm sorry for them. Though digital has opened up new areas of creativity and editing that were simply unimaginable 20 years ago, much of the empirical magic of photography is gone.

I still carry a loaded film body with me. I still occasionally pull it out and snap off a photo. About twice a year I'll fill up a roll and send it out for processing. Out of 24 or so images on a roll, I find that over three fourths are keepers that are frame worthy. Subsequently this exercise helps me improve my patience and mental focus when I'm shooting digital. I suggest you try the same. Top notch 35mm cameras of yore are available on the cheap everywhere you look. Get yourself a good piece of glass and an old film camera. Fire off a few rolls of film and compare them to your digital work. I think you'll be surprised at just how good of a photographer you are.

Instagram - Good or Bad?

Image credited to Instagram
A few months ago I joined in on a heated discussion of the virtues and woes of Instagram when a friend posted comments of their disdain for the popular app. This discussion occurred prior to the recent controversy of their recent T&C update. The discussion was amongst consumers and pro photographers discussing whether Instagram rocks or sucks. By the end of the discussion, there was no consensus on the issue.

The Instagram product allows one to apply edits to their photos in the form of filters, borders, color variants, etc. with their smart phone. The results are often photos that mimic lomography and lo-fi cameras of decades ago. Some argue that people are attempting to recreate a reality that doesn't exist with vintage filters. I've heard some say that the filters ruin otherwise good photos. Being that there are two sides to every story, I've also heard people say that the filters make it easy for them to personalize photos with effects they wouldn't otherwise have the tools or skill to use.

How one judges Instagramized photos is a matter of personal opinion. However, critics should tread lightly as just about every commercial image we view has been edited to some extent, thereby altering reality. You've probably seen some of the bombshell stories on just how airbrushed most models are in commercial photography.

While I'd probably never utilize their filters to adjust one of my fine art photos or include Instagram as part of my professional workflow, they have their place for kitsching up a photo of a Starbucks cup to post on Facebook.

While I don't believe that your photo will become the next face of a brand without your knowledge or compensation, there is some gray area created by the most recent T&C. That gray area should be enough for any professional photographer to delete their account for no other reason than the fear that their copyrights may not be honored or respected.

Is Instagram good? Yes. Is Instagram bad? Yes. Its all a matter of opinion. If you think you're being unique and expressing yourself, well I suppose that's your opinion but you're only as unique as everyone else who uses the same app as you.

Thursday, January 3, 2013

How Much Retouching is Too Much?

By now most people know that even famous supermodels don't always look as great as they appear in magazines. Digital photo editing can create and remove things once only possible with plastic surgery. A few swipes of a mouse can remove gray hair, beauty spots, scars, wrinkles, extra weight, extra chins, saggy eyes etc. You get the point right?

For many people, retouching is expected when they hire a professional photographer. Is there a happy median or is it a situation of the more the better?

Here's an example, what do you think?


Wednesday, January 2, 2013

Eye-Fi Cards are Awesome

Christmas was a very special time when I was growing up. My parents went out of their way to be generous and to provide my brothers and I with gifts we'd enjoy. Now that I'm a husband and a father, the role has primarily shifted from recipient to the giver. My daughter's first Christmas was a blast. We had family in town and ate great food while we exchanged laughs, hugs and great presents.

I didn't ask for much because I pretty much have everything I need and most of what I want. My family is supportive of my passion for photography so they do a great job at finding me unique gifts that support my craft.

This year I received an Eye-Fi card. These things are cool.

Photo credit Eye-Fi.com


If you've never used one or haven't heard of an Eye-Fi card, they are SD cards with built-in WiFi. You can turn just about any camera that uses an SD card into a WiFi enabled device.

Recently I've decided to shoot commercial gigs tethered to my PC. However, I've been unable to find a long enough cord to accomplish linking my camera to my computer. Cables are available, but the length is limited to about 9 feet. I could make it work, but extra cables and wires are a pain.

I get this Eye-Fi card for Christmas and set it up. Set up was quite easy to do and didn't take long. There is a procedure that you will need to follow to get the card setup. It comes with a USB reader needed to accomplish this task. You'll also need to setup an Eye-Fi account. You don't need to subscribe to their image hosting services to use the card, but additional backup is never a bad idea.

Once the card is set up, just shoot a photo and it is uploaded to your account, social networks, image hosting sites and your computer. You link the card's built-in WiFi to specific networks. When the camera is powered on, the images will upload to that network.

Even high resolution .jpg files upload quickly. Raw images, in my case .nef files take quite a bit longer to upload. If you're in a hurry, this may not be the product for you. However, if you want to remove a step from your workflow this card is a great tool.

So, back to my statement about shooting tethered. The reason for doing so is so that I can edit images on the fly and see them as they appear on a calibrated screen. While Nikon's screens are good, you often miss a lot of detail that you'd otherwise see on a high definition monitor. So, now I can shoot an image and load it right to my computer and bam, done.

The technology is neat and it works well. I wish I'd have had one earlier. 


Creative Maternity Photos

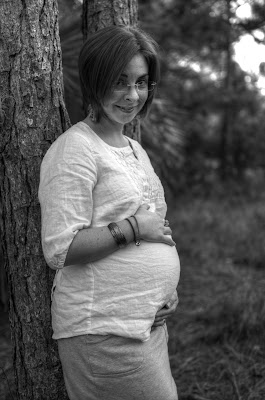
As a relatively new father I've enjoyed every minute of time since we found out we were having our first baby. As a photographer I was excited about utilizing this opportunity to hone my skills in maternity portraiture. Maternity photography is a whole new ball of wax for a photographer more who was more familiar with still life, landscape and fine art work. Fortunately I have a very photogenic wife who is also a great sport.

I do my best to drive my inspiration and creativity from within, rather than to use the work of others as a guide. That's not a knock to many of the the world's great photographers, but rather a reflection of my personal desire to do something a bit different.


When we were about six months along we felt like we were at a great place in the pregnancy to capture my wife's healthy glow of soon-to-be motherhood. We chose a location near the water, at about 90 minutes before sunset. Late day sun, just prior to sunset is flattering and warm. This particular park is quite large and offered a variety of wonderfully natural backdrops which I felt were also quite complementary to the naturalness of pregnancy.

I had specific goals in mind.

Capture my wife's happiness and glow
Flatter her baby bump
Collect memories in a natural setting
Use ambient light to enhance the mood

Everyone has a better side or angle from which they look best. While I know my wife better than anyone, I did have to look at her differently than I normally do so that I could find the right angles for a great photo. After experimenting a bit I found a handful of great views that would yield great results. While the light was clear, low and smooth I did need the aid of a reflector to fill in the dark sides of photos.

So, back to creativity. I didn't want any "say cheese" photos. Fortunately, warm Florida winters also allowed for gorgeous weather around St. Patty's day. For those who don't have the luxury of fabulous year-round weather, a studio shoot is equally as awesome.

Avoiding "say cheese" photos takes a bit of skill. Not only does one have to be a photographer, but also a director. It is crucial to direct your subject by speaking with them, conveying a feeling of comfort and ease while helping them pose in ways that are flattering and aesthetically pleasing.

Few things are more natural than pregnancy so the outdoor setting was ideal. I chose to use a mix of forest, water and sunset to capture the mood.

One thing I would highly suggest is that every couple get a beautiful head shot photograph during this time too. It is easy to focus solely on the belly but remember that this is a great time to capture a woman's healthy glow. I know I use that word a lot, but "glow" is a very real thing during pregnancy.

Well, enough talk. Here are few of the photos:


Here are a handful of other recent maternity photos. 


Tuesday, January 1, 2013

Tampa Bay Professional Photography

Tampa Bay Area Professional Photography

Ad Infinitum Digital Photography captures moments and memories and preserves them forever.

About us:

Nikon DSLR cameras
Nikkor lenses
20 years of photography experience


Specialities:

Family
Headshots
Maternity
Newborn
Product
Food and Restaurant
Events
Nightlife
Automotive
Landscape
Fine Art

Contact us through this blog or visit www.adinfinitumdigital.com


Food Photography Tips

As a career marketing professional, a foodie and a photographer I often get to mix my passions. I try to stay up on Tampa Bay's best eateries new dishes. Tampa Bay has grown to become a great place for awesome food. Food and Travel Networks food shows have been to the area many times and have picked out some of the area's hidden gems.

Over the past year I've seen restaurants make marked moves to become more social. Usually this means that a well-intentioned company representative posts a photo of a new dish to Facebook. While I love the information, I think most restaurants are doing themselves a disservice by posting poor quality photos.

Here's the thing. Food doesn't just involve the senses of taste and smell. Food involves our eyes and brain equally as much. Conveying taste through an image is difficult. A less than perfect food photo can actually turn people away, having the opposite effect you desire. You've got a limited opportunity to engage your customers through social media. Use that opportunity carefully. Do it right and you'll bring new guests in the door. Do it wrong and you'll send your loyal customers to competitive restaurants.

While it would be best to hire a photographer to do quarterly food photo updates of new dishes, there are things that you can do to make your food photos look better.


1) Lighting: Without light there would be no photography. In fact, I think photography is as much a practice in mastering light as it is of mastering the subject and composition.

Don't rely on your camera's built-in flash to create flattering light on your food. The flash on a camera has limited utility and food photography isn't one of it's strong suits.

Instead, find copious amounts of natural light. Depending on the time of day and the weather you can use the sun's rays to provide you with flattering light. Experiment by moving the plate around and moving yourself around from different angles to get the right shot.

If you have access to professional lighting, softboxes and other light modifiers, you can recreate natural looking light. This takes money, practice and a bit of know-how. Leave the lighting gear to a professional photographer. 


2) Presentation: Ask your chef to do his or her best work on presentation. Garnishes should complement the dish, conveying additional appeal. Food should be fresh. Hot food should be shot hot. Frozen foods should be shot immediately. Timing is important. If you're shooting multiple dishes ask the kitchen to stagger the delivery of the dishes, allowing you enough time to take adequate photos of the dishes  you're shooting. There are volumes of information available on jazzing up food with spritzes of water, or a brushing of olive oil. Expect that you may have to adjust the position of a tomato, or a sprig of mint. Play around and check your work as you shoot.

3) Ambiance: If your restaurant has flair, capture some of those elements in your work. Are the tables hand-laid mosaics? Are the walls flocked with paintings of a famous artist? Does the restaurant's design complement the regional flair of the dish? All of these things are important to take into account when shooting food. While the bulk of your image should be the dish, don't ignore your surroundings.

4) Get low: While we're used to seeing food from a distance of about two feet and an angle of 45 degrees, this isn't the best angle for photography. Get to about the level of the plate then move up a few inches. You want to shoot at a low angle and close to the dish. This will help to accentuate texture and volume. Since dishes are all different, you'll want to move around and move the dish around to get the best view.

5) Maximum Aperture: Have you ever wondered how photographers are able to get the background blurred out when they shoot a photo? This is achieved with a wide lens aperture, creating a shallow depth of field. The shallower the depth of field, the more the focus area of the photo will be pulled from the surrounding area.

Camera phones and point and shoot cameras may not allow you to change the aperture of a lens. Most of those cameras have a fixed aperture, which is often fairly large and not good for creating a shallow depth of field. A DSLR camera can use lenses with a very large aperture. If you know your way around a DSLR use that instead. You can mimic depth of field with software and some smartphone camera apps. These solutions create mixed results and often not the look you want for promoting your food, so I'd suggest you not use these.


Food photography isn't the most difficult thing in the world, but it does take some knowledge, experience and practice to get things right. Experiment, and try different things. Strive for well-lit, flattering, high quality images. Instagram is fun and all but don't use those photos if you want to draw people into your restaurant. If you're unsure about your photos, don't use them.